Quick Start
The Quick Start section shows the complete steps to deploy and run a slightly modified Tinc VPN on D.Network platform. It creates a concrete instance based on the abstract DNet overlay network definition. The instance overlay network is a Layer 3 Virtual LAN.
For admins, please get familiar with the 7 steps workflow before continue.
Roles
There are three types of roles:
- Network Admin (dnet-admin): admins use dnetcoin wallet's
dnetcoin-clicommands to manage the dnet records, e.g creating a new dnet and add/delete member nodes, assigning ovc resources; - Cloud resource provider (ovc-provider): ovc is the cloud backend of the overlay network. The ovc resource admins use
dnetcoin-clicommands to register ovc cloud resources into DNetDB andvlan-clicommands to add authorized dnet. - End user (end-user): end users run
vlan-clicommands to initialize, start, join and connect to an overlay network.
Workflow
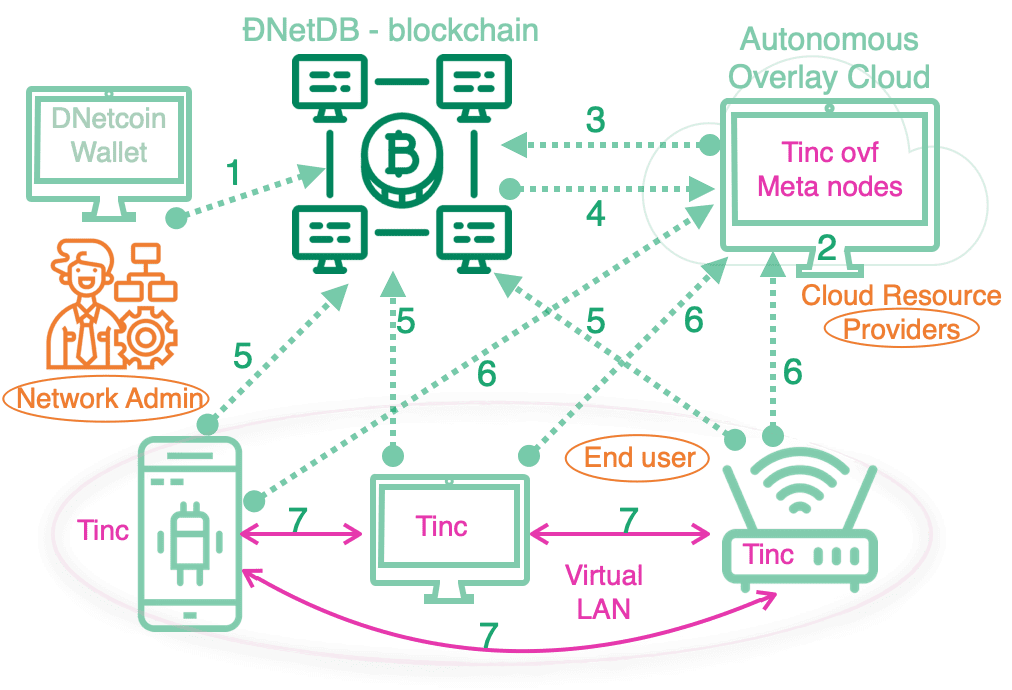
- Add a dnet record to generate a dnetID (dnet-admin);
- Add an ovc record to generate a ovcID (ovc-provider);
- Add OVF to DNet, insert ovcID into dnetID's record (dnet-admin);
- Authorize DNet in OVF, the Tinc's meta node is the OVF(ovc-provider);
- Add nodes to dnet, insert Tinc nodes' pubkey into dnetID's record (end-user, dnet-admin);
- Tinc Node Connect to OVF (end-user);
- Layer 3 Private Overlay Network created (end-user).
For the end users, only the step 5,6,7 are needed.
Software
| Programs | Description | Run-On |
|---|---|---|
| dnetd | the DNC Token wallet and DNetDB daemon | end-node |
| dnet-cli | The CLI to manage dnetd | end-node |
| dnet-app | the App with GUI | end-node |
| vland | the vlan app daemon, which can be configured to run as client or ovc app | end-node for client,cloud for ovc |
| vlan-cli | The CLI to manage vland | end-node for client,cloud for ovc |
| vlan-app | the vlan App with GUI | end-node |
Note: only the vland daemon needs to run 24x7 for the overlay network, and other tools are launched whenever needed.